Saturday, July 16, 2011

Astra Double & Single Dot sanding disks

Astra Double & Single Dot sanding disks are available for 50 & 75mm sizes. These are sold for use with a rotary sander but it could be used or any small electric sander.

The single dot sand paper comes in 80, 120 and 180 grits

The double dot sand paper comes in 240, 320 and 400


Each dot is made up of the grit of stand paper


The dot patent makes the sand paper very had to clog. It cuts faster than conventional sand paper.

120 grit Sand paper after standing a maple bowl.


As the sand paper cuts it stays relativity cool. When used with a rotary sander the results are very smooth with no linear sanding marks.
There is also a Champagne sand paper for the rotary sander which go from 500 to 600 to 800 to 1200 grit for a very fine finish.
Over all the Astra dot is the sand paper to use on the rotary sander if you want fast effective results.

Pack of 12 disks
50mm $10.05
75mm $11.10

Friday, July 15, 2011

UBeaut Shellawax Cream

Shellawax cream is a one application friction for woodworkers. It can be used on a lathe on carving works and on flat surfaces. 

How it is used 


1. Turn or carve, the piece.


2. Sand piece to 400 grit for start, but it is recommended that you sand to 1200 grit to achieve a better finish. 

The finer you sand the glossier the finish will be. 


 3. Use a clean soft rag to evenly apply a thin coat of the Shellawax Cream to the          piece


Shellawax Cream is of yellow colour but does not have any effect of the colour of the finish 
Light coat of Shellawax on the bowl  


4. Turn the lathe on and with same rag used to apply the light coat apply a  heavy pressure to the work, moving the rag over the piece.


The pressure melts the finish and burns it in to the work  leaving brightly shining 


Shellawax cream is a very easy finish to use on a lathe, on small surfaces such as boxes it can also be used on larger surfaces. It can only be used on raw timber.  As it is a friction polish it melts in to the wood and does not feel sticky or tacky to touch. The finish that is left is a very shiny, the shine can be dulled, this can be done by letting the wax dry when you first apply it to the work.   It can be used by any wood-worker. When compared to regular shellawax and glow it is quite thick this is the reason it is more suted to use on bowls and larger pieces, this is because it will not dry before you get to the other side of the object. All U' Beaut polishes have a saying "polish with a gimmick... it works" and so far so good 


Bowl Sander Upgrade

After completing the bowl sander I purchased a 50mm Velcro backing pad.

 Adding the Velcro to the sander using contact glue

Tuesday, July 12, 2011

Bowl Sander

This is a rotary sander for sanding bowls on a lathe, you can buy these in a store but they can be very expensive, so this is an economic version to make at home.

Equipment:
Wood lathe
Lathe chuck  (or some other way to hold the timber)
Drill
Drill bits

Materials
Materials:
1 - Metal or wood bar (140 x 25mm)
1 - Block of timber (60 x 60 x 35mm)
1 - Piece of dense foam (60 x 60)
1 - Bolt (40 x 8mm)
1 - Nut to fit bolt
4 - Washers to fit bolt
2 - ABEC bearings
Loop Velcro
Contact glue


1.
Mount the timber in the lathe chuck (or other holding method); turn to a round shape 50mm in diameter. Drill an 8mm hole in the centre of the piece; this will be to fit the bolt.


2.
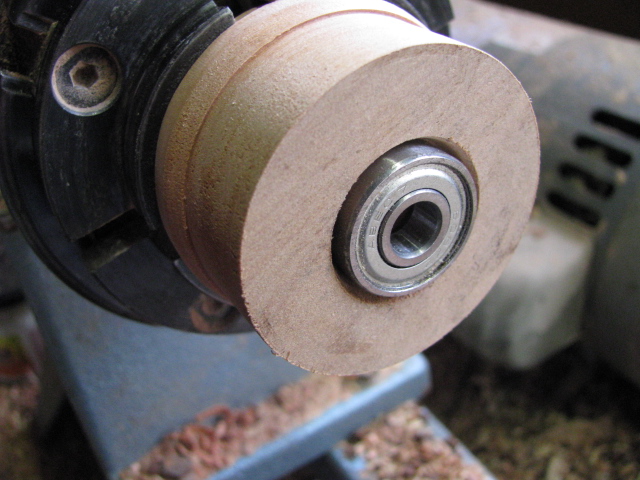
Turn a tapped hole starting 23mm in diameter in the end of the timber that and tappers down in to the 8mm hole.  The tapper is so the outer ring of the bearing will be pressed against the timber making it unable to move, while the inside ring will spin freely. Test the fit of the bearing.


3.
Turn the piece so the opposite end is ready to be turned. Turn a hole that is about 20mm deep and 23mm in diameter. Now tapper the end of the 23mm hole down to the 8mm hole. Test the fit of the bearing and the bolt. The bolt needs to be far enough thought to fit the bolt and handle.

4.
Drill a 9mm hole through one end of the handle, for my handle I used a piece of steel bar with three sides. File all of the rough edges smooth.

5.
After parts are ready to assemble they need to be assembled, the parts are assembled by threading the bolt through one washer and on to the bearing, this is put through the timber block in the deepest hole, the second bearing and another washer go on the other side of the timber block, now the handle is threaded on, now two washers and the nut tighten the lot together.

6.
Read and understand the instructions and safety advice on your contact glue before using. Spread an even layer of contact glue on the face of the timber block and on the foam layer press together, leave until dry. Depending on the brand of glue this may vary.

7.
Spread an even layer of contact glue to the other side of the foam and the back of the back of the Velcro press together until dry.  

8.
Once dry you can add a chosen grit of paper and try it out on a bowl.